Showing posts with label miniatures. Show all posts

Tuesday, 3 September 2013

Doll's House Project: Fireplace Tiles


After promising to share more of my miniature projects, working towards the completion of my doll's house pub, here's a quick look at one little piece I finished over the weekend - tiling the back of my fireplace. 

I used polymer clay to make the tiles - rolling white clay out flat, cutting it into squares, then sticking the squares onto a clay backing, before baking and then 'grouting' the tiles with PVA glue, and adding my design with blue acrylic paint. 


Some of the tiles came out a little wonky, but I quite like the character the look lends to this bedroom feature. When finished I sealed the tiles with clear spray varnish.

Apologies for the below-par quality images - I had to take photos through the window of my doll's house pub!

I need to make the actual hearth for the fireplace to sit on next.


Saturday, 27 July 2013

A Doll's House Non-Update


A fair few of you have been kind enough to ask for an update on my doll's house pub in recent months. I'd love to show you all the new details, the shiny pub sign above the door, the clay people bringing it to life despite being themselves inanimate...but I can't. The truth is that life has been getting busier and busier, and opportunities to indulge in adding to this miniature world have become scarce. 


There are some big changes happening around here at the moment, and at a rate of knots, too. This is mostly a positive thing - as change often turns out to be, in the end - but it does mean that my little doll's house will probably have to be packed away and sent to stay with family for a while. My grandad built it and gave it to me for my second Christmas, so I think it's fitting that he looks after it for the time being.


That said, not having the house at the moment doesn't in any way mean I can't make things for the house, or other miniature projects. I have scrapbooks full of ideas. So to those of you who have asked for a mini update, thank you and the answer is yes; there will be more miniature happenings on this here corner of the web soon, just not in the form I had planned.


Making doll's house miniatures remains my original crafty passion; the hobby that got me into being resourceful, working out how to make things from scratch, and creating worlds and times I could never otherwise visit in real life. I reckon such an important part of my crafting life does deserve a little more attention on this blog.


My grandad often tells me he'd like to see this particular art project finished, and it's true that I have been working on it for eleven years! Hopefully soon I'll have some new items to share with you.


Wednesday, 1 May 2013

Miniature Inspiration: Emma Metcalfe's Doll's House Pub


So you know how my long-term doll's house project is furnishing a Victorian pub, right? I may have mentioned it! Anyway, when this amazing pub by talented miniaturist Emma Metcalfe appeared on the Dolls House Emporium's Facebook page last week, having won third prize (third?!) in their Creative Competition last year, I just knew I had to show you. I want you to see the kind of amazing work that got me into miniatures in the first place. 


It's the quirky, personal touches. The way Emma has created something that we would never get to experience in the modern world. I was blown away by her creation.


Emma also won the competition in 2011 with her Welsh nineteenth century cottage. I also adored this project. I really like Emma's use of Welsh slate, something I have incorporated into my doll's house to honour my own link with the Snowdonia area, having visited my grandparents there all my life. 


If you could create any scene in miniature, from any time period, what would you choose? This is one hobby I don't think I'll ever fall out of love with.


Friday, 22 February 2013

Guest Post: Four Little Walls Talks Doll's Houses and Starting Her Dream Business

Today I'd like to introduce you to my final guest, Kat, a fellow enthusiast for all things miniature. Kat has taken her passion one step further and done what many of us dream of - turn it into a business - and she has been kind enough to share her story below. Welcome, Kat!


Hello,
I was thrilled to be asked to guest post for Miss Beatrix this week, a visit is always a pleasure, albeit a virtual one!

Before I waffle on too much let’s get better acquainted.

My name’s Kat, nice to meet you! I run online doll’s house boutique and blog, Four Little Walls.
I live in Kent, though my heart belongs to Brighton, and spend most days up to my elbows in doll’s house related mess!


Four Little Walls came to be in January 2012. I had left a job in publishing that Christmas with a view to …well I didn’t actually know what I wanted to do right at that moment, but I knew it was going to have to be big, and in 1:12 scale!

Doll’s houses and miniatures have always been my first love. I love to make furniture and accessories, both for the shop and for myself but its lovely to splurge on some special pieces every now and again too!
At 14 I landed my dream job, though I didn’t realise it at the time, in a specialist doll’s house shop in my hometown, and THAT my friends is where things got serious!


This place was filled from floor to ceiling with everything and anything the miniature-loving heart could wish for. From pocket money-friendly trinkets, DIY essentials to eye-wateringly expensive but undeniably beautiful, artisan made pieces, it was all there. Of course my wages went immediately back into the shop. I already had a little Georgian house my dad built for me but my head was soon turned by ‘The Blenheim’ from The Squirrel collection, another Georgian style house, with four floors, dog legged stair cases and working sash windows. I remained at the shop until it closed down in 2003, I was heartbroken!


Following seven years of sporadic attention I decided to show the doll’s houses some love and began blogging my mini misadventures whilst job hunting. The interiors tend to have a more modern feel at the moment and I set myself the ’52 week challenge’, posting a mini tutorial or idea every Friday for the whole year. I’m pleased to say I succeeded but there were a few moments where I wondered if I’d bitten off more than I could chew with a weekly project like that!

It was a few months into the year when I decided to take the plunge and have a go at running the business. The blog had gained some lovely loyal readers who were incredibly encouraging so I contacted the Prince's Trust and was lucky enough to find myself part of their enterprise scheme.

It’s been, and continues to be, tough trying to get the business off the ground, (doll’s houses are really not ‘essential’ items are they?!) but I am literally doing my dream job so I can’t complain!


I love every part of the job (okay, maybe not accounts!) but my favourite bits have to be planning new rooms and themes and of course choosing stock!
It’s also great to hear from customers as to how they’re using their miniatures; I just had my first order from Australia which was very exciting! The little bits and pieces were destined for a 1940’s style house, exciting to think of Four Little Walls stock being so many miles away!

If you fancy having a nosey at what I’ve been up to or a little look around the houses pop over and say hello. A big thank you to Anna for having me post today, it’s been a pleasure!

Kat x


Thank you so much for sharing your story, Kat. I wish I was your Australian customer, building my dream 1940's doll's house! Despite it being really tough out there I love reading about people making their passion into an income, and you've certainly inspired me.


Friday, 8 February 2013

Distress Yourself Miniature Chair Kit Review

Towards the end of 2012 a few of you mentioned that you would like to see more doll's house and miniature themed posts on this here corner of the web. I couldn't agree more. All things mini remains one of my major hobbies, not to mention the first craft I ever took seriously, and I've been having a think about how I can bring more of that to this blog, without alienating those of you who enjoy a broad range of crafts and vintage adventures. Watch this space... 

Anyway, it seemed rather good timing when Kat of Four Little Walls contacted me to ask whether I'd like to review her new 'Distress Yourself' chair kit. Ever one for doll's house fun and crafting combined, I said a hearty yes please. 


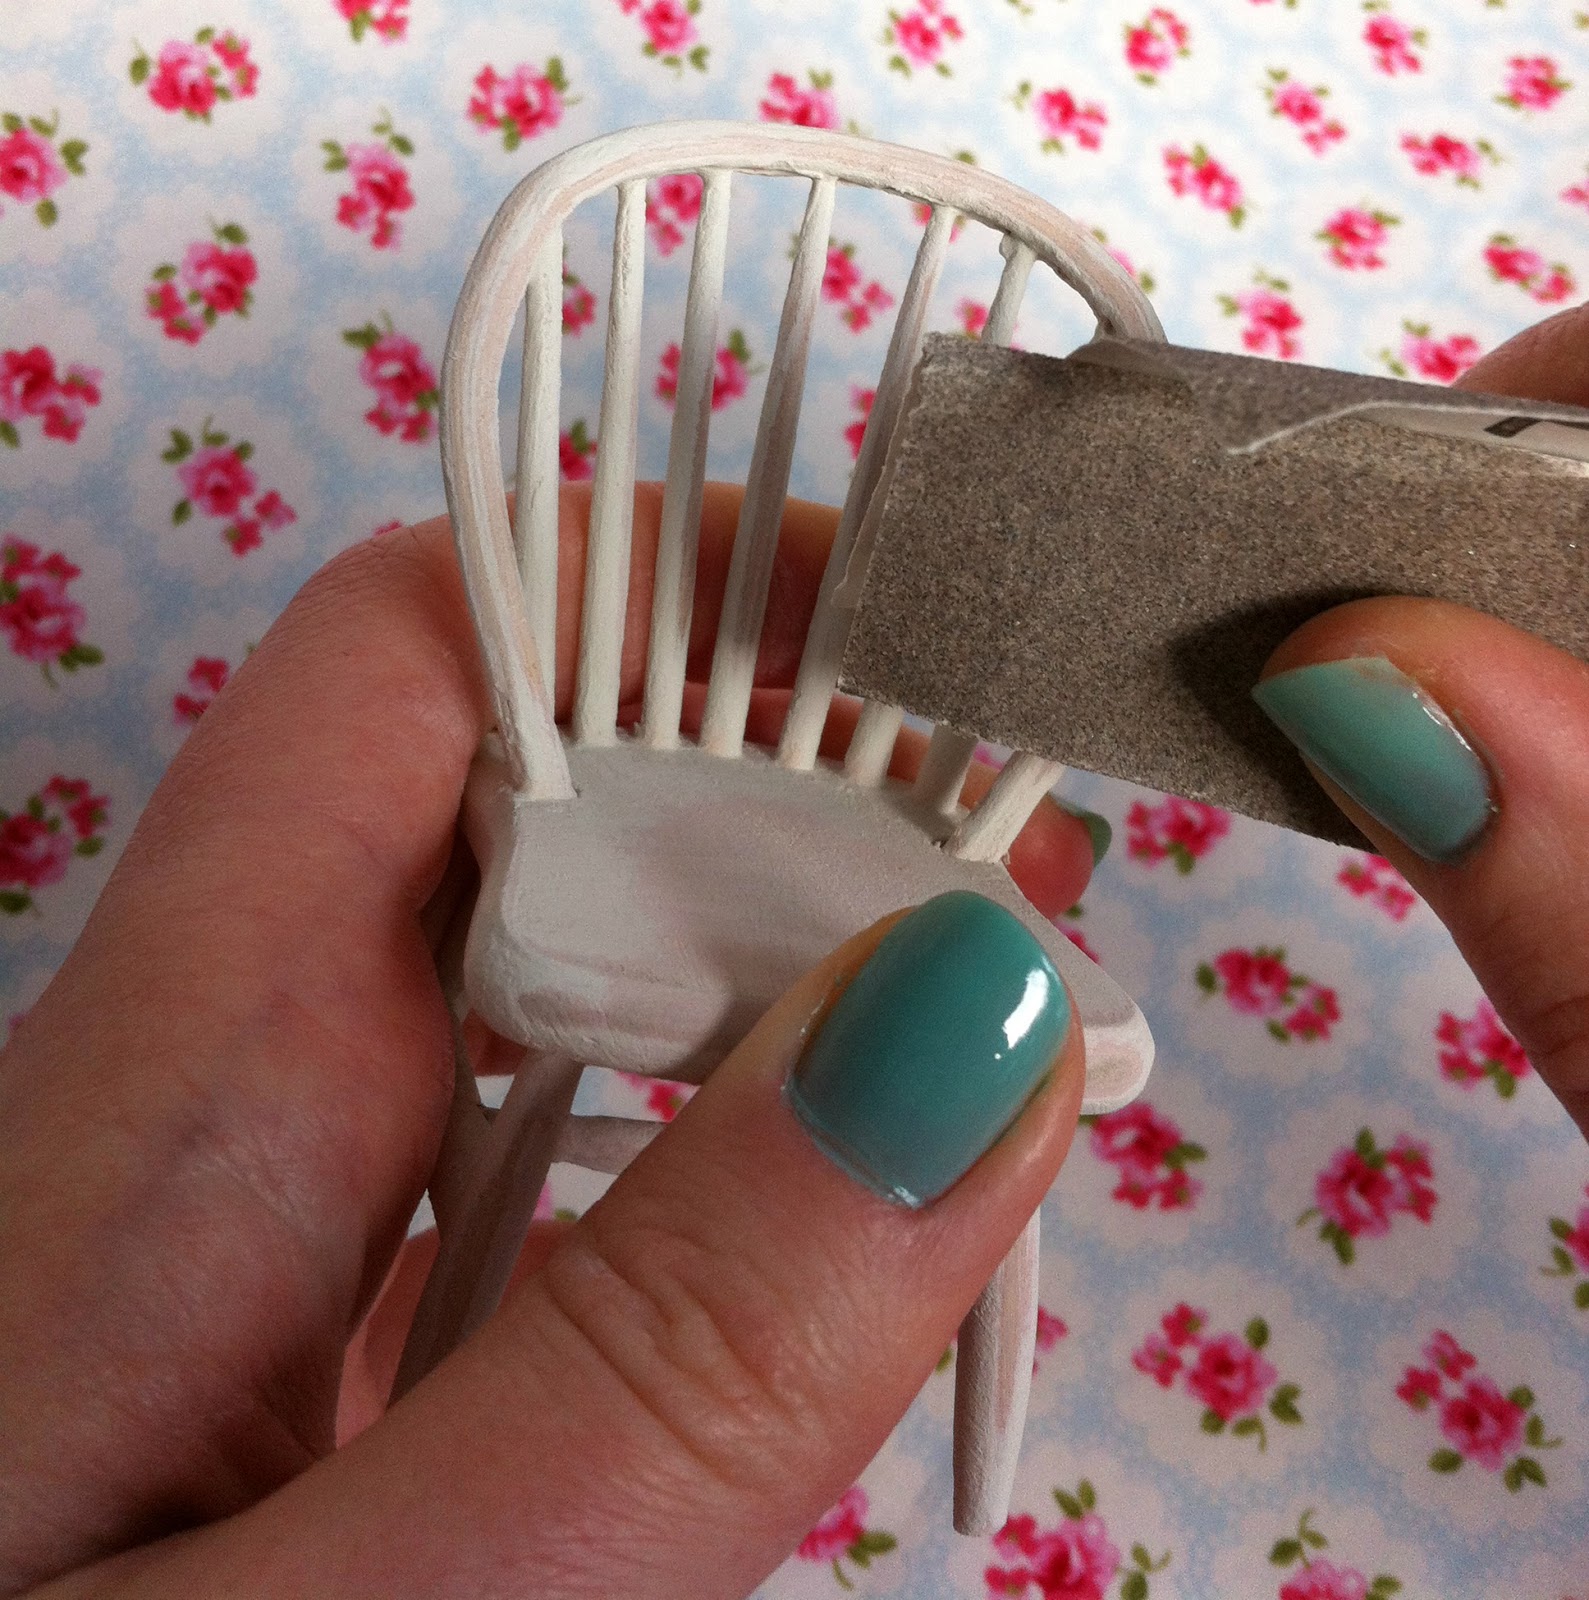
Here is the kit. Included was one wooden chair thickly coated in off white chalky paint, some sandpaper and a tip sheet. It was all very simple. I got to sand that chair as much or as little as I liked, the intention being to give it a pleasing shabby chic distressed effect.

Because I like to go for realism as much as possible with my miniatures, I decided to sand where the chair would come in contact with the person sitting on it, to make it look as authentic and well-loved as possible. So I spent quite a lot of time where the, ah - posterior - would be, the back of the legs and the back. Once I'd given it a wipe with a barely damp cloth I finished my chair with a coat of matt varnish, as suggested on the tip sheet.


Here is my chair all finished. What I liked about this kit was that the chair has a very classic feel, so it would work in any style or period home. I'm even thinking about painting a little stool to go with it. I tend to think of doll's house lovers falling into two camps: the crafters - those who like to make most if not all their items, in a sort of magpie, patchwork style and the collectors - who buy their furniture and other pieces and will quite often happily pay a lot of money for a good quality sofa or desk to proudly display in their (often large and beautiful) doll's house. 

I fall into the former group, of course, and enjoyed this kit because it fulfilled my desire to make the piece my own. I probably couldn't make a chair, but I do want to customise everything in my house. It's probably also a good idea for those new to the hobby or crafting in general, or indeed the collectors, because as much as they like ready made, they don't necessarily like the mass-produced look (I have a slight problem with some items sold by The Dolls House Emporium for this very reason). My chair was ready to pop inside its new home within fifteen minutes, varnished and all, which makes for a satisfying few minutes' work! The chalky paint worked nicely with the sandpaper too; no need to ruin my hands scrubbing away at the same spot.


The Distress Yourself chair kit costs £7.00, and I believe Four Little Walls has plans to add other pieces to the range. Although as an enthusiastic crafter with sandpaper never far away I may choose to paint and distress other furniture myself, I reckon this kit will appeal to those who enjoy quick and easy doll's house projects or anyone wanting an entirely customised and realistic look for their furniture. I'm also pretty sure that pre-teen me would have thought this was a brilliant way to kick start my adventures in all things mini.


What do you think to my new chair? It makes me want to go and sit in the garden on a warm summer's day. Oh, and Four Little Walls is offering 15% off all online purchases before 28th February with code 'minilove'. 


Disclaimer: For the purposes of this review I was sent one Distress Yourself chair kit. My views are honest and my own.

Monday, 3 December 2012

How to Be a Thrifty Crafter, Part 2


Hello my dear crafty chums! Today is the second in my thrifty crafting feature (part one here). 

I was in my early teens (stop me if you've heard this story before - this is going somewhere!) when I first stumbled across the idea of owning a doll's house as part of a hobby, rather than a child's toy. I had grown out of playing with my own beloved house years before, but as my grandad had made it for me and it was very special I didn't feel I could move it on to a new home, so it simply sat in the spare bedroom, ignored.

One day I was on a visit to Rochester with my family when I spotted a shop selling doll's house miniatures. I was instantly captivated by the idea of grown ups having doll's houses, and collecting furniture for them. I could create my dream house, or even my dream world, from any era - and I already had the house! 

There was just one problem. I could see from a quick glance in the shop's window and then a Dolls House Emporium catalogue that I had fallen in love with a hobby which cost a lot of money. I'm talking hundreds. Thousands. It's a popular hobby for the middle and upper class retired, and no wonder. I was a teenager with a minuscule income. I quickly realised I was going to have to use my imagination and a lot of creativity to turn my doll's house into the vision I held in my head. 

That Christmas, I received just the help I was looking for, in the form of these two books:


Andrea Barham and Patricia King opened my eyes to the world of making your own doll's house miniatures out of things you have hanging around your house. Perfect! Since then I have made all sort of craft projects - not just miniatures - simply by looking at household objects from a different perspective. I have added many items to my 'must have' crafting list, and I'm going to share this list with you... (yes, we finally made it to the end of my little story!)


The contents of my dressing table are made from household finds. Bits of lace, an old keychain, a candle made from a birthday cake candle and a button, and a perfume bottle made from beads. 


1. Head for your jewellery box. We all have old costume jewellery which is now out of date or broken. Grab these items like Gollum and clutch them close to your chest. They are incredibly useful for all sort of crafting projects. Next, any old Primark handbags, embellished shoes or belts. Cut the shiny bits and buckles off and add those to your pile. Old costume watch? Keep that too. Hurrah!


Just look what clever Patricia King made with an old pair of sunglasses. I'm tempted to wrap some old frames with washi tape and wear them when thinking up crafty plans...


2. We're on a roll! Head out to the garage or shed. Take a note of any semi-used pots of paint or cans of spray paint. Look out for wire, garden twine, lovely pebbles (perfect for painting!), varnish, metal washers, plywood and balsa wood. 

3. Think like a child. Remember junk modelling? Very handy when it comes to thinking about packaging. Never throw anything out without checking to see if there's anything useable on it. Cereal boxes provide useful cardboard, lipstick cylinders, toothpaste lids, metal wine bottle tops... the list goes on!


An old disposable razor and a toothpaste tube. 
Another of Patricia King's creations.


4. Now you've gone shopping in your home, it's time to shop from other people's! Once or twice a year I email friends and family, and ask them ever so nicely to have a clear out. I make it easy for them by giving them a list of things I'm looking for. The first time I did this I was in the sixth form, and hadn't told more than one or two close friends about my crafting hobby. They found my requests a little odd at first, understandably, but then they really got into the spirit of it and produced some brilliant finds, including a guitar plectrum (perfect for a spot of Tatty Devine-style jewellery making!), an old locket - which I made into a double photo frame for my doll's house, and some handy bits of driftwood! Since then I've handed this list out to work colleagues and family alike, and always find they're genuinely interested in hearing what I'm planning to make with it all. And as you never know what you're going to get your little gifts can inspire all sorts of new ideas. 


I have popped my full list of the items I ask/look for here, but first, a little word about storage. You'll need it. I only store small and medium items. There is no need to keep every cereal box that passes through your home - if you need cardboard for a project, you know it's in the cupboard. I am making my own Christmas crackers this year so have kept (and microwaved to get rid of germs) twelve loo role centres, but I don't keep the centre of every loo roll used in my house! You don't want to become like one of those poor hoarder folk off the telly... 

If you're collecting small items such as jewellery findings, I learnt early on that they need to be carefully stored and easily accessible. There's nothing more annoying than losing a precious hour of your Sunday afternoon to hunting for that teeny tiny cabochon. I use a box with lots of compartments, so I keep earrings, beads, brooches, chains, etc, in separate sections. 


I like this way of storing because I can easily take a look inside to remind myself of what I have in stock. 


I mentioned in my last post useful shops for art and craft materials. If you're struggling to find handy items for free, of course there's always car boot sales and charity shops. I've found loads of handy bits of bobs from those. It's also been known for me to buy cheap jewellery from Primark, only to dismantle it an hour later. They often have sale racks full of costume jewellery - score! 


The jewel on my mini Jubilee hat was a Primark pendant, bought for £1.50. It's supposed to look like Kate's engagement ring. 


Some handy books and blogs if you fancy having a bash at crafting with household items:


Inspiring blogs:


Do you make things out of household finds? I'd love to hear about your projects!

Have a collectible Monday,



P.S: If you have borrowers residing in your home, please treat them kindly and at least leave some useful items for them to borrow. Bea seems to think we have some here, as she thoroughly sniffs around all the skirting boards every morning.
PPS: New buttons will be in the Etsy shop before the end of the week :)

Friday, 28 September 2012

Cath Kidston 'Make Your Dream Room in a Shoebox' Competition Entry


Oh friends, why oh why do I give myself these challenges?! When I spotted on the Cath Kidston website early last week that they were holding a challenge to create your dream room in a shoebox, well, it felt like I couldn't not enter. Competitions where you get to make something in floral in a tiny scale don't come along very often, after all! Never mind that my to-do list was growing by the day and that I started a new job this week, I set about finding myself a shoe box and getting stuck in. The results are not to the standard and detail I usually like to employ in these projects, but here is my entry in any case.


Despite not leaving myself very much time I always love these sorts of projects, using the initial ideas I jot down and then adding others in as the scene develops and starts to tell its own story. The little china dog turns up in many of my miniature projects, but think he'll find his final home in that 1940s house I hope to create one day. I can see him with a new sign around his neck that reads, 'Wot no bananas!'

And I'll definitely be making more mini teepees in the future!