Showing posts with label DIY. Show all posts

Monday, 27 May 2013

Quick Rosette Make and Our First WI Meeting


Last Tuesday was the first meeting of the Kelham Island WI (KIWI) in Sheffield! It went really well, with a relaxed atmosphere, lots of new faces to get to know, and a really welcoming venue. We had a chef demonstration and barista skills on the menu, both of which were delivered by the talented Hayley of The Grind CafĂ©, and I was tasked with making name badges, to help us all get to know one another. 

After a bit of fiddling around with items hanging around my craft stash, I came up with these simple and fun rosettes. 


All you have to do is cut out a small card disc, glue a strip of ribbon into it, then layer up flattened out cupcake cases and doilies however you wish. Write your name on the doily - or a message of your choice - and tape a safety pin onto the back. Voila! Instant champion status! These worked well because the ladies were at my crafty table long enough to have a chat, but the make was super easy for those who feel daunted by crafts. Those who took part came up with some really clever personal takes on the design too!


Em of Oh Gosh Em


Wednesday, 24 April 2013

Make Your Own Letter Rack


If you're one of the one hundred and eighty lovely people to have joined #PostCircle, you're hopefully getting a lot more happy post than you used to. But what do you do with your post once you've opened and admired it? How do you keep track of the people you need to reply to, and if, like me, you don't live alone, where does new post wait for you until you have time to sit down and enjoy a good read? 

Enter your very own handmade letter rack!


You will need: 


  • 2 sheets 1/8" x 4" x 36" balsa wood - available from craft shops (I went to Hobbycraft)
  • Wooden letters (optional) - I got mine from the kiddies' craft section in Hobbycraft for £1 for a pack of 20
  • A glue gun or wood glue
  • A craft knife and cutting mat
  • Paint in your chosen colour - I used white gloss spray paint for easy, even coverage but this is entirely up to you. I find spray paint is less likely to warp your wood when wet. 
  • A pencil and ruler - use a metal ruler for cutting if you have one
  • Decorations of your choice - washi tape seemed like a fun idea for my letter rack

1. Measure and cut five pieces of wood, 22cm long. Your wood is already about 10cm wide, and we're working with this width right the way through, so no need to measure that. 


2. Cut two squares, 10 x 10 cm. These will be your sides. Take one of your squares and make a pencil mark one cm in from the left, and 4cm down from the top, on the right, as shown below. Draw a line between these two marks, then cut. Repeat with the other side in exactly the same way. 


3. Hooray, that's all your pieces cut out! Now we just have to give them a trim so they fit together. Set aside two of the lengths you cut out. They will make the back wall and the base of your rack. Take the other three and one of your side pieces. Line up the bottom edge of one of your lengths with the bottom edge of the side piece, where you would like the first slot of your rack to be (my first is 3.5cm from the back of the side piece). Where the length sticks out from the top of the side piece, make a pencil mark. (See image below). We're trimming the slots of your rack to line them up with the sloping diagonal of the sides. 

Draw a straight line across the top of the length at the height of the pencil mark, and trim. Repeat for one of the other lengths, again around 3-3.5cm apart from the last slot. The last length will be your front, so that will line up with the height of the front of the side piece. 


4. Next it's time to glue the letters onto the front panel! I used my trusty glue gun for this bit. 


5. Paint time! Cover your work surface in newspaper, and work outside if you're using spray paint. Give all your pieces an even coat of paint, on both sides, repeating if necessary. Try not to let your wood get too wet - it's better to do more thin coats - so you don't warp the wood. Go and have a cuppa and a cheeky biscuit while that lot dries. The paint has now strengthened the wood so your rack will be nice and sturdy. 


6. All we have to do now is assemble the letter rack! You can use a glue gun or wood glue for this bit. I used a combination of both because a glue gun got me strong, fast results, and the wood glue gave me more time on those joins that needed a bit of adjustment. Glue the front on first, placing the front piece on top of the base, not in front of it. The same goes for the back. If you need to do a little trimming at this point don't worry, we're going to give everything a last spray of paint to clean up any raw edges. 


Construct the actual 'box' first to give it structure, then glue in your slots last. Once you're happy and the glue is dry, give everything a last coat of paint. I chose to spray my finished rack with a coat of clear varnish too, but that's up to you, depending on the type of paint you used. 

7. The fun bit! Decorate your rack however you like. I used washi tape and printed some labels for the slots. You could paint flowers onto yours, or add stickers or stamps, whatever you wish!


I've chosen to keep my rack on my desk, but it's also lightweight enough to use sticky foam pads to attach it to a wall, bookcase or door.

Another way I'm displaying my post is with a baker's twine washing line in my workspace!


Have a well organised Wednesday,


Friday, 8 February 2013

Distress Yourself Miniature Chair Kit Review

Towards the end of 2012 a few of you mentioned that you would like to see more doll's house and miniature themed posts on this here corner of the web. I couldn't agree more. All things mini remains one of my major hobbies, not to mention the first craft I ever took seriously, and I've been having a think about how I can bring more of that to this blog, without alienating those of you who enjoy a broad range of crafts and vintage adventures. Watch this space... 

Anyway, it seemed rather good timing when Kat of Four Little Walls contacted me to ask whether I'd like to review her new 'Distress Yourself' chair kit. Ever one for doll's house fun and crafting combined, I said a hearty yes please. 


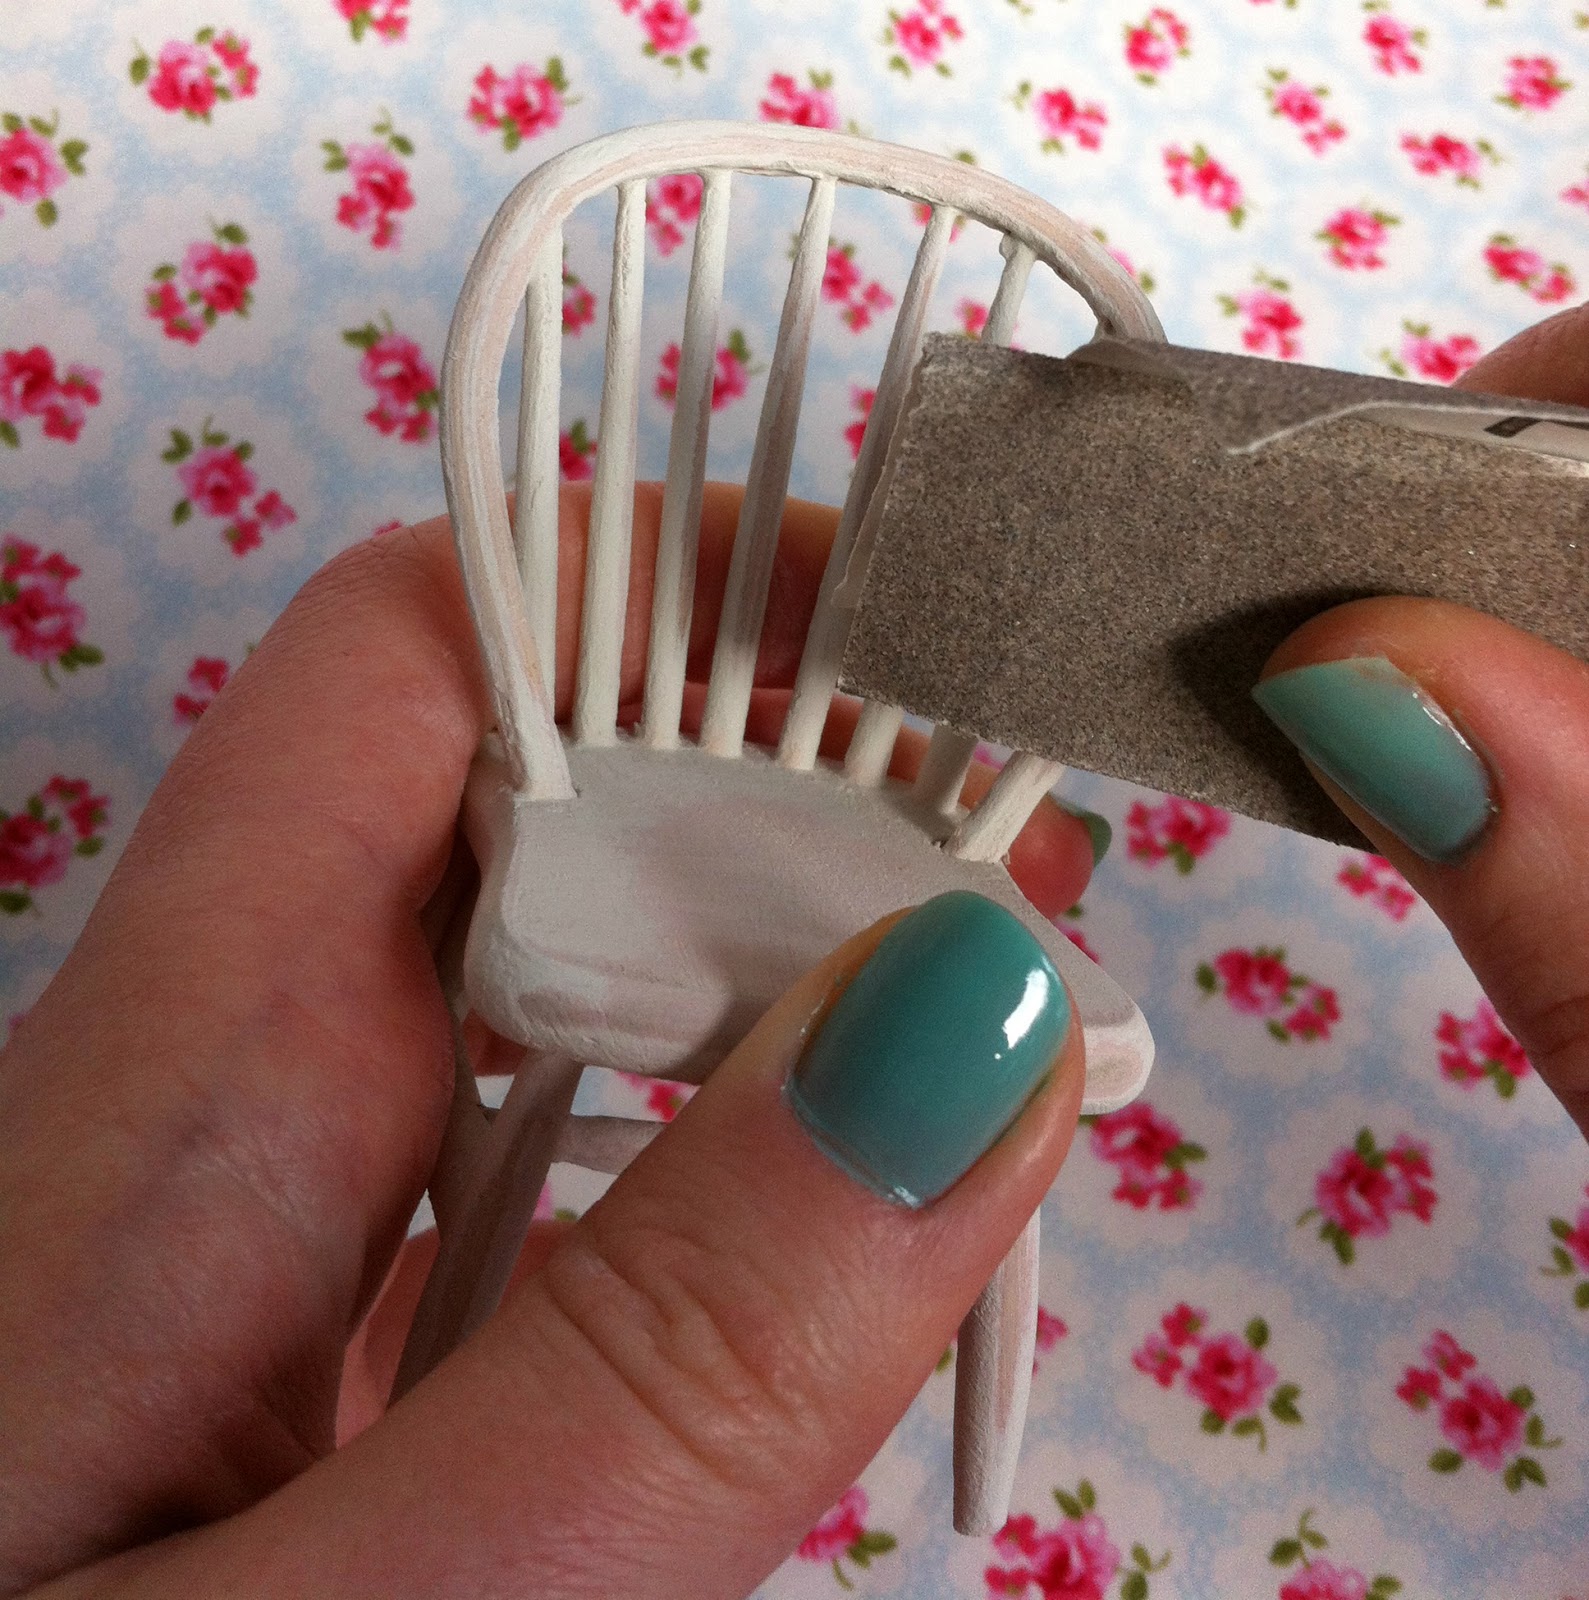
Here is the kit. Included was one wooden chair thickly coated in off white chalky paint, some sandpaper and a tip sheet. It was all very simple. I got to sand that chair as much or as little as I liked, the intention being to give it a pleasing shabby chic distressed effect.

Because I like to go for realism as much as possible with my miniatures, I decided to sand where the chair would come in contact with the person sitting on it, to make it look as authentic and well-loved as possible. So I spent quite a lot of time where the, ah - posterior - would be, the back of the legs and the back. Once I'd given it a wipe with a barely damp cloth I finished my chair with a coat of matt varnish, as suggested on the tip sheet.


Here is my chair all finished. What I liked about this kit was that the chair has a very classic feel, so it would work in any style or period home. I'm even thinking about painting a little stool to go with it. I tend to think of doll's house lovers falling into two camps: the crafters - those who like to make most if not all their items, in a sort of magpie, patchwork style and the collectors - who buy their furniture and other pieces and will quite often happily pay a lot of money for a good quality sofa or desk to proudly display in their (often large and beautiful) doll's house. 

I fall into the former group, of course, and enjoyed this kit because it fulfilled my desire to make the piece my own. I probably couldn't make a chair, but I do want to customise everything in my house. It's probably also a good idea for those new to the hobby or crafting in general, or indeed the collectors, because as much as they like ready made, they don't necessarily like the mass-produced look (I have a slight problem with some items sold by The Dolls House Emporium for this very reason). My chair was ready to pop inside its new home within fifteen minutes, varnished and all, which makes for a satisfying few minutes' work! The chalky paint worked nicely with the sandpaper too; no need to ruin my hands scrubbing away at the same spot.


The Distress Yourself chair kit costs £7.00, and I believe Four Little Walls has plans to add other pieces to the range. Although as an enthusiastic crafter with sandpaper never far away I may choose to paint and distress other furniture myself, I reckon this kit will appeal to those who enjoy quick and easy doll's house projects or anyone wanting an entirely customised and realistic look for their furniture. I'm also pretty sure that pre-teen me would have thought this was a brilliant way to kick start my adventures in all things mini.


What do you think to my new chair? It makes me want to go and sit in the garden on a warm summer's day. Oh, and Four Little Walls is offering 15% off all online purchases before 28th February with code 'minilove'. 


Disclaimer: For the purposes of this review I was sent one Distress Yourself chair kit. My views are honest and my own.

Tuesday, 1 January 2013

DIY: Easy Vintage Style Doggie Bandanna

Happy New Year!

Bea isn't a fan of clothes per sé, as many dogs aren't (take note silly doggie fashion boutiques). Although she has a hand knitted jumper and a coat, one of which I make her wear when it's really chilly out, in all honesty she'd rather gamble about naked, happy as Larry.

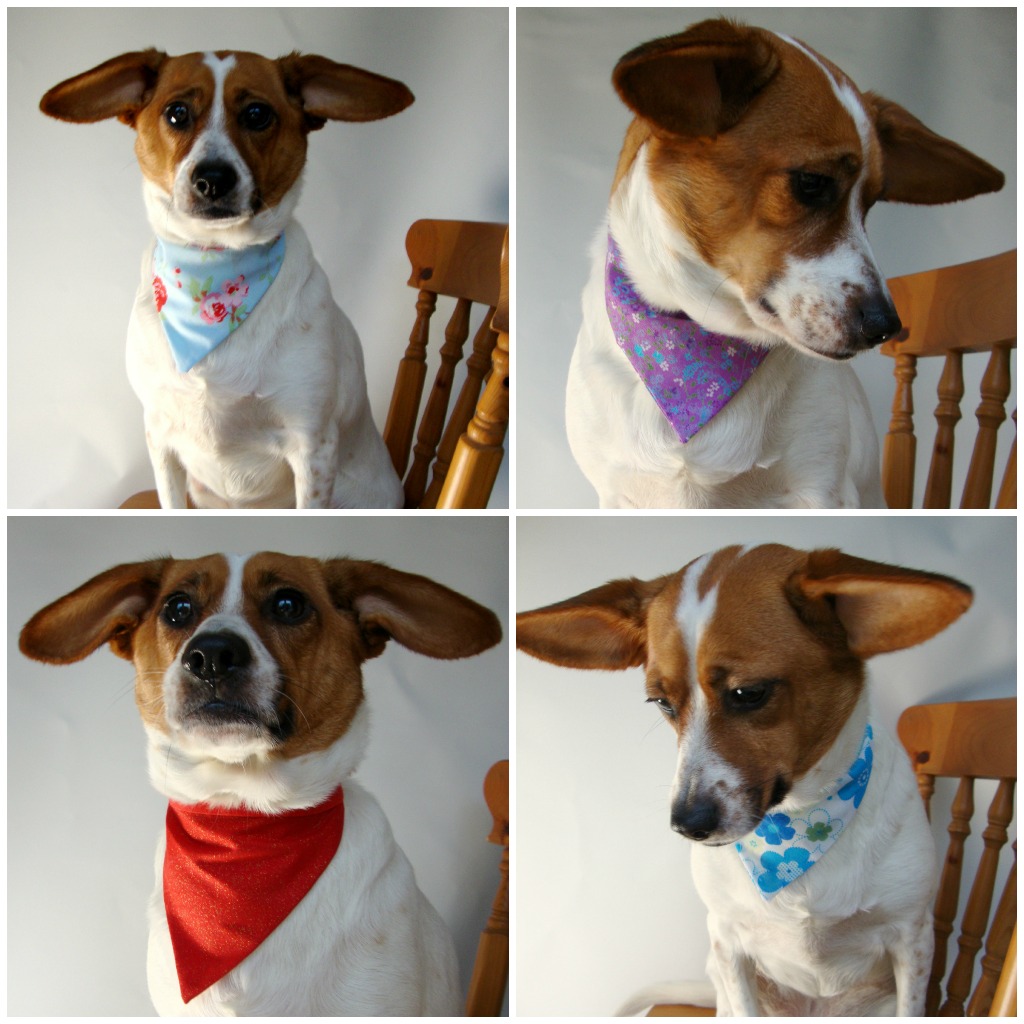
...Until recently. When faffing about on Audrey the sewing machine a few weeks ago I whipped up a doggie bandanna. Bea looked very sweet in it but really I expected her to protest and chew it up within five minutes. But to my surprise she loved it! She paraded around the house, showing it off, then attempted to sleep on her face (I kid you not) so I couldn't take it off her. Perhaps, I thought, Bea has finally succumbed to my love for vintage fabrics!

(I apologise for her ears in the following photos - they just would not behave. In fact, I'm thinking of selling the one of her in red to the RAF for their next recruitment campaign.)


Since then I have made a few more in different colours. They are so quick and easy to make and your pooch could have an entire new wardrobe in less than an hour. They also make the ideal - postable - gift for the dog owner friend who has everything. I've never met a human who isn't as happy to receive a gift for their adored pet as they are for themselves! They make a brilliant way to use up fabric scraps, too.

You will need:
Your chosen fabric, ironed
Card
Half a metre of bias binding
Pins
Sewing machine (you can just as easily hand sew, it'll just take you longer)
Fabric marker pen/ tailor's chalk

1. Measure across your pooch's chest, then draw a line of the same length on your card, adding an extra centimetre for the seam allowance. Then add two more lines to make a triangle. How deep your triangle will be is up to you - I made Bea's fairly shallow because I didn't want her chewing the bottom corner.


2. Cut out your template and label it. I keep all my project templates in a tin then I can quickly make more in the future. Draw two triangles on the wrong side of your fabric and cut them out. Now pin, right sides together.


3. Leaving 5mm seam allowance, sew the 'v' of your triangle. Don't bother with the top edge. Turn it right side out, and trim the pointy bits off on the top edge.


4. Take your bias binding and fold in half with your fingers, all the way down the length. You could do this with the iron, but it often the iron removes the starch and makes the binding too stretchy. Position your triangle in the middle in the fold, pin, and sew along the entire length of the binding.


5. Finished! You can knock up many more really quickly, and they're machine washable too (well, a doggie mum thinks about these things). Also, if you're happy to use the same colour bias binding every time, you could make triangles in different fabrics and sew them all at once - just like bunting - snipping them into separate bandannas afterwards.


Are you up to any crafting on this New Year's Day?



P.S: By tying the bandanna on through the hoop in your dog's collar (s)he can't pull it any tighter. Obligatory health and safety notice!

PPS: Alfie definitely won't let me put a guinea pig bandanna on him. Shame, because I think he'd look fabulous in pink.